Configuring Datasource
3.2 Configuring a Datasource template JSON
Section titled “3.2 Configuring a Datasource template JSON”A Datasource template is a JSON document with metadata that defines how to retrieve data from a specific source. The configuration includes details about the source URL, necessary input parameters, and the structure of the output data. Below is a description of key parameters
3.2.1 Metadata
Section titled “3.2.1 Metadata”The data source template metadata defines the ID, name, description and icon for the data source that will be visible to users.
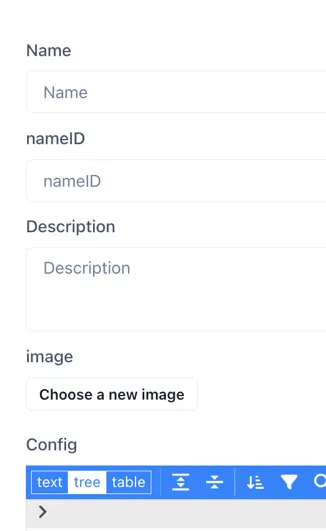
Name: Mandatory. This is the text that will identify the data source to users. It should be something descriptive and meaningful, but not too long!
nameID: Mandatory. This is the machine-friendly name of the datasource that will be used by the code. It should be fairly short and not contain any spaces.
Description: Mandatory. This will appear in italic text below the data source name in an drop-down boxes. The description should contain as much detail and relevant information as possible. If there are any limits (e.g. number of requests per day) using the API, this should be mentioned here.
Image: Optional. Uploading an image makes it easy for users to identify the data source. The image will be cropped to a circle so it is best to start with a square image if possible. The image can be a png, jpg or svg.
3.2.2 Configure the data source
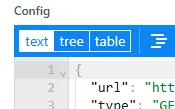
Section titled “3.2.2 Configure the data source”The config section is where the connection to the data source is defined. The easiest way to edit the the set-up is in text mode. To get into text mode, simply click on text in the top left of the config box:
The data source is defined as a JSON document. The main sections to complete are:
url: The API request’s base URL, supporting path parameters wrapped in {{ }}.
Type: Defines the HTTP method used for the request, supporting: GET, POST & POST_FORM
Inputs: {} An array defining the path parameters that will be provided to the API.
Output: {} Define the data that the data source template will return. This is typically a subset of the data the API returns.
Useproxy: true or false. Defines if the the API request must be sent via a proxy
compatibleWith: value|multivalue|chart|table defines the data source compatibility (see section 1.5) - the - types of component that can use the data provided by this API.
There are a number of additional parameters that can be added to further refine how the datasource behaves. The full template (typescript) definition for a data source is given in Appendix 1, and full details for each parameter are laid out in Table 3.1
Inputs JSON config
Section titled “Inputs JSON config”Path Parameters are dynamic placeholders inside the URL path. They allow API requests to be flexible and retrieve specific resources based on the provided values.
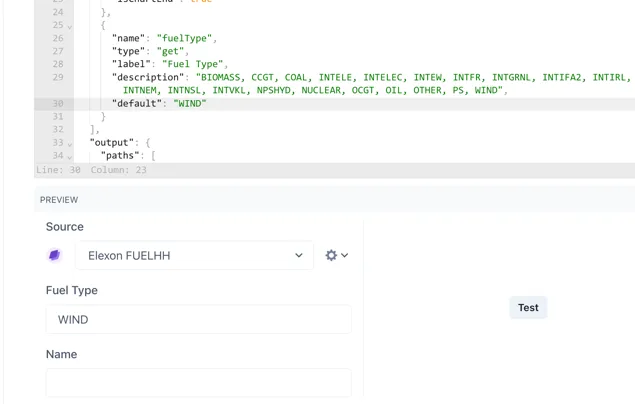
name: Required. A string representing a machine-friendly name for the input, e.g., “AIRPORT_CODE” or “tag”.
parameterName: The name of the parameter as it appears in the URL or request body, e.g., “arr_iata” or “tag”. As you requested, this should be the parameter name itself, like “timeZone”.
type: Required. Specifies where the input parameter should be placed in the request. Possible values are
“body”; to be used in conjunction with POST_FORM request type
“url”; the parameter will be substituted for the {{placeholder}} enclosed in double curly brackets in the URL e.g. foo.io/{{bar}}
“get”; the parameter will be appended to the url (i.e. the URL string [does not]{.underline} need to include ?bar={{bar}})
“header”; parameters that will substituted into the the header section if configured, for example authorisation tokens
“json”; can be used in conjunction with the POST request type
format: An optional object that defines the format of the input value, especially useful for dates. It can include:
type: The data type, e.g., “date”.
pattern: The format pattern for dates, referencing https://date-fns.org/v2.30.0/docs/format, e.g., “yyyy-MM-dd’T’HH:mm:ssXX”.
timeZone: The timezone for date inputs, e.g., “CEST”.
label: A user-friendly label displayed above the input field in the UI, e.g., “3 letter airport code, e.g. LGW or JFK” or “Tag”.
default: The default value to use if the user does not provide an input.
multi: A boolean indicating if multiple values can be selected for this input.
encode: A boolean indicating if the input value should be URL-encoded.
transform: An optional string to specify a specific transformation for this input, e.g., “transformSmartdashInput”.
isRequired: A boolean indicating if this input is mandatory.
isAdvanced: A boolean indicating if this input should be hidden under an “Advanced” section in the UI. Defaults to false if omitted.
isChartStart: A boolean that, if true, indicates this input will use the chart’s start time. Only one input can have this set to true. See isChartEnd for usage.
isChartEnd:A boolean that, if true, indicates this input will use the chart’s end time. Only one input can have this set to true, and it applies only to data sources supporting charts. For charts/tables any isChartEnd input will get set to the ‘End’ value set in a widget’s live options, which may or may not be inherited.

for any other widget, in the live options there’s just ‘Date’, which will set the isChartEnd input:
isHidden: A boolean indicating if the input should be hidden from the user interface but still configurable.
isCode: A string that, if set to “sql”, will display an SQL formatted text box for user input.
isConfigurable: A boolean indicating if this should be shown as an input during data source installation.
showBasket: A boolean indicating if this input can be added to a basket (presumably for bulk actions).
showTagEdit: A boolean indicating if a search icon should be displayed for this input, likely for searching tags.
showStaleAfter: A boolean that enables a staleness indicator for components using this data, useful for live or frequently changing data.
When to use which input parameter type
Section titled “When to use which input parameter type”URL
Use the “url” type when the parameter is part of the url path — i.e. a path parameter. Path Parameters are dynamic placeholders inside the URL path, for example;
https://foo.com/products/{{num}}/itemUrl parameters must set as required;
isRequired: trueGET
Use the “get” type for query parameters that will be appended to the url as key-value pairs, for example;
https://foo.com/products?item=numGet parameters can be either optional or required.
JSON
json will go with POST
BODY
body will go with POST_FORM (edite
Example Usage
If an API needs to fetch product details by product ID, the URL might be structured as follows:
'url': 'https://dummyjson.com/products/{{num}}''Inputs':[ { "name": "num", "type": "url", "label": "Product number", "description": "The number of the product to fetch" }]Outputs JSON config
Section titled “Outputs JSON config”An object defining the data that the data source template will return. It contains:
paths: An array of objects, where each object defines an output field. Each object has the following fields:
name: Required. A human-readable name for the output field.
path: Required. A JSONPath1 expression to locate the desired value in the API.
type: The data type of the output value, e.g., “date”.
label: Helpful text to display to the user for this output field.
default: The default value if no value is found in the API response.
format: An optional object to define the format of the output value, especially for dates, with type and pattern fields similar to input formats. For
Example Usage
This example returns the values and timestamps and formats the timestamp to work with a chart component (which requires an output named ‘x’ with the timestamp) for an API string response in the format:
"2025-01-11T12:58:21.035Z"The format part of the ‘x’ output would be:
"output": { "paths": [ { "name": "x", "path": "$.*.startTime", "format": { "type": "date", "pattern": "yyyy-MM-dd'T'HH:mm:ss.SSSX" } } … ]This will return a proper timestamp value as the “x” output that can be used by the chart component. The reason for this is:
- yyyy-MM-dd → year-month-day
- ‘T’ → escapes the literal “T” in the string
- HH:mm:ss → hour:minute:second
- .SSS → milliseconds
- X → ISO timezone (Z for UTC, or +05:00, etc.)
Other JSON config
Section titled “Other JSON config”transform: An optional string specifying a transformation function to apply to the output data, such as ‘transformSmartdash’, ‘transformHistorianServlet’. Transforms are necessary when the API response is complex and cannot be parsed into the outputs required with JSON path expressions alone. Transforms are pre-built , secure, code libraries within Ingenuity 7 that perform a dedicated function. It is not possible for users to write their own transforms.
headers: An optional object containing key-value pairs representing custom headers to be included in the API request, such as “Authorization”.
useProxy: A boolean indicating whether the API request should be sent via a proxy. Defaults to false. The default is false but it is required whenever authentication is required on a data source to prevet CORS errors in the browser.
trendWith: An optional string specifying the data source ID of another data source that provides a trendable version of the same parameter.
compatibleWith: An array of strings defining the types of components that can use the data from this data source. Possible values include “table”, “chart”, “value”, and “multivalue”.
batchSize: An optional number specifying the batch size for requests.
isTrendable: An optional boolean indicating if the data from this source can be used in trends.
isWriteable: An optional boolean indicating if data can be written back to this source.
errorPath: An optional object defining the path to error information in the response.
format: An optional object defining the overall format of the API response, such as “json” or “csv”, with associated options (e.g., “delimiter” for CSV).
concurrentSize: An optional number specifying the number of concurrent requests.
isUnique: An optional boolean indicating if the data should be unique.
writeWith: An optional string specifying another data source ID to use for writing data.
function: An optional function to be executed for data retrieval or transformation.
3.2.3 Configuring Authentication or Authorization
Section titled “3.2.3 Configuring Authentication or Authorization”Some APIs are secured with a token or a username and password. The different methods and how to configure the data source are described below.
API Key
Section titled “API Key”A unique key (token) is issued to each user and is sent in either the headers or query parameters.
To configure an API key in the headers the minimum configuration would look like this:
"inputs": [ { "name": "ApiKey", "type": "header "isRequired": true } ], "headers": { "key": "{{ApiKey}}" }, "useProxy": true,To send the API key in the URL the configuration would look like this:
"inputs": [ { "name": "ApiKey", "type": "URL", "isRequired": true } "useProxy": true,The name of the input should match the name of the parameter to be appended to the URL as it will be sent like this:
…/data?ApiKey=abc123Basic Authentication
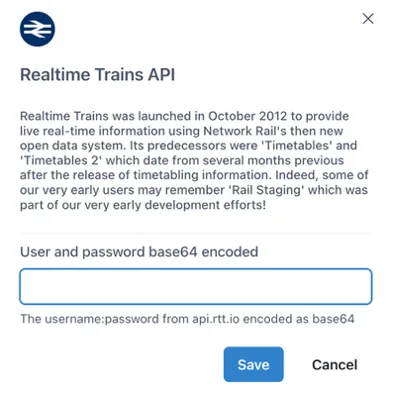
Section titled “Basic Authentication”Basic Authentication uses a username and password, Base64 encoded. It is sent in the HTTP headers. The minimum configuration is:
"inputs": [ { "name": "userPassBase64", "type": "header", "isRequired": true } ], "headers": { "Authorization": "Basic {{userPassBase64}}" }, "useProxy": true,To encode a username and password as base64, paste the string into https://www.base64encode.org/. For example, to pass the username=”foo” and password=”bar”, paste the string “foo:bar” in the above website:
Required authorisation:
"Authorization": "Basic foo:bar"Encoded string to use in datasource config:
"Authorization": "Basic Zm9vOmJhcg=="Bearer Token (OAuth 2.0)
Section titled “Bearer Token (OAuth 2.0)”Bearer Tokens use a token (often obtained via OAuth) to authenticate. It is sent in the Headers only (never URL). The minimum configuration is:
"inputs": [ { "name": "bearerToken", "type": "header", "isRequired": true } ], "headers": { "Authorization": "Bearer {{bearerToken}}" }, "useProxy": true,Note that using this minimal configuration will mean that the API must be configured each time the data source is used. To be able to save the API key when the data source is installed, see section 3.4.
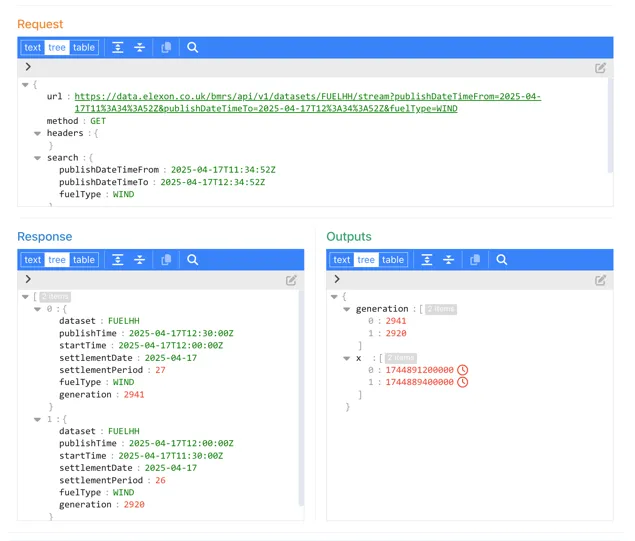
3.3 Testing the data source
Section titled “3.3 Testing the data source”Once the configuration is complete, you can test the data source using the Preview section below the config window. Enter any required input parameters and click the “Test” button.
A new panel will appear below showing the request sent, the response received back and the resulting Outputs according to the configuration. This lets you troubleshoot any errors and make sure the output is configured correctly.
3.4 Making Parameters Configurable
Section titled “3.4 Making Parameters Configurable”You can define variables as configurable, meaning their values are provided during data source installation. These inputs can also be marked as hidden, so users never see them. This is especially useful for sensitive authentication parameters, such as API keys. It prevents accidental sharing and simplifies usage for authorized users, who won’t need to enter the key manually each time.
To achieve this, extend the input parameter configuration with the “isConfigurable” and “isHidden” properties. For example, the following configuration enables a one-time entry of the API key during installation:
"inputs": [ { "name": "userPassBase64", "type": "header", "label": "User and password base64 encoded", "isHidden": true, "isRequired": true, "description": "The username:password encoded as base64", "isConfigurable": true } ],Users can enter the base64 encoded value of the username:password the data source is installed: