

Installation Guide
3 Creating a New Data Source
Section titled “3 Creating a New Data Source”Ingenuity 7 comes with an ever-expanding library of data sources that can be installed at the click of a button. However, if the one you need is not available, or you have created a new custom data source in the Ingenuity Scripts module, then you can create a new data source template in your instance and install it.
3.1 Defining and installing a new data source
Section titled “3.1 Defining and installing a new data source”New data sources must first be created as a new Datasouce Template in Ingenuity Hub. You must be configured as an Administrator of your Subscription in order to be able to create new Data source Templates. There are four steps to creating a new data source, with the first step only required for Driver based data sources:
-
Install and configure the relevant Eigen Ingenuity driver (not required for Web APIs)
-
Create a new Datasource template
-
Configure the new Datasource template
-
Install the new datasource in your subscription
3.1.1 Step 1: Install the relevant Eigen Ingenuity Driver
Section titled “3.1.1 Step 1: Install the relevant Eigen Ingenuity Driver”For data sources that require a driver, this must be installed and configured in the Ingenuity back-end by a system administrator. See section 5 for details.
3.1.2 Step 2: Create a new Data source Template
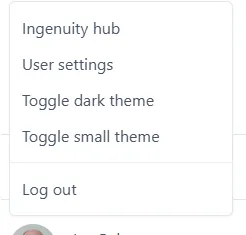
Section titled “3.1.2 Step 2: Create a new Data source Template”To access this, click on your account name in the bottom left corner of the screen and choose Ingenuity hub from the pop-up list that appears.
Select the “Datasource templates” tab in the Ingenuity hub:

And finally, click the “Add data source template” button in the top right corner.

3.1.3 Step 3: Configure the new Data source template
Section titled “3.1.3 Step 3: Configure the new Data source template”New data source templates open with the following blank JSON configuration:
{ "url": "https://dummyjson.com/products/{{num}}", "type": "GET", "inputs": [ { "name": "num", "type": "url", "label": "Product number", "description": "The number of the product to fetch", "isRequired": true, "isHidden": false, "isConfigurable": false }, { "name": "test", "type": "get", "label": "Test", "description": "A test option", "isRequired": true, "isHidden": true, "isConfigurable": true } ], "output": { "paths": [ { "name": "price", "path": "\$.price" } ] }, "useProxy": false, "compatibleWith": ["value", "multivalue"]}Replace the dummy data with the information for your data source. See section 3.2 for all the available configuration options.
3.1.4 Step 4: Install the data source
Section titled “3.1.4 Step 4: Install the data source”Install the data source as described in section 1.8.